When Enabling a Script in Unity Will It Run the Start Function Again

I work in Unity a lot and, while I'thousand always learning, it's like shooting fish in a barrel to forget that, for a lot of people using the software for the first time, the most useful techniques to know are often the most bones ones.
Once y'all know the nuts information technology'south much easier to learn more, to experiment and to develop more than advanced ideas. And then, to assist, I've decided to put together an easy guide that covers the basics of playing audio and sounds in Unity, forth with some real examples that yous can use in your project.
Then… How exercise you play audio in Unity?
There are several different methods for playing audio in Unity, including:
- audioSource.Play to start a single clip from a script.
- audioSource.PlayOneShot to play overlapping, repeating and non-looping sounds.
- AudioSource.PlayClipAtPoint to play a clip at a 3D position, without an Audio Source.
- audioSource.PlayDelayed or audioSource.Playscheduled to play a clip at a time in the time to come.
- Or by selecting Play on Awake on an Sound Source to play a clip automatically when an object loads.
Each method has its own unique benefits and use cases and in this commodity I'll be explaining how each i works in particular likewise as providing some examples that you tin can apply in your game.
What you lot'll find on this page
Methods for playing audio and sounds in Unity
- How to employ Play
- How to use Play I Shot
- How to apply Play Clip at Point
- How to apply PlayDelayed and Play Scheduled
- How to use Play on Awake
- Set up-made options
Useful examples of sound triggers
- How to play a random audio
- How to play a repeating sound
- How to play a sound when pressing a button
- How to start music or audio when entering an expanse (3D & 2D)
- How to play a sound when colliding with an object (3D & 2nd)
- How to play a audio when destroying an object
How to play audio in Unity
Here's a quick overview of the five different methods and how they work.
How to employ Play
//Plays an Sound Source audioSource.Play(); Call Play from a script to offset an Sound Source:
public class PlayAudio : MonoBehaviour { public AudioSource audioSource; void Start() { audioSource.Play(); } } Calling Play will trigger whatever Audio Clip is prepare on the Audio Source. It'south the about common method of triggering audio and is well-nigh suitable for playing looping sounds and music.
This is because another methods, such as Play I Shot, cannot trigger looping sounds, and also because using Play will only allow i clip to exist played at a time from that Audio Source.
Calling Play on an Audio Source that is already playing volition stop the Audio Source and start the clip once again.
How to use Play One Shot
//Plays a specific prune on an Audio Source once audioSource.PlayOneShot(AudioClip audioClip, Float volumeScale); Play One Shot is peradventure the bottom-known method of triggering a audio on an Audio Source but is extremely useful for triggering sound effects.
public course PlayAudio : MonoBehaviour { public AudioSource audioSource; public AudioClip clip; public float volume=0.5f; void Start() { audioSource.PlayOneShot(clip, volume); } } Play One Shot is chosen on the Audio Source and takes a parameter for the Audio Prune to play. This ways that you lot must specify what clip yous would similar to play when you call PlayOneShot.
If, however, you merely desire to play any clip is on the Audio Source (like you would with play) then y'all can just pass a reference to that clip like this:
audioSource.PlayOneShot(audioSource.clip, volume); Yous can too set an optional volume scale when calling Play Ane Shot. This takes a bladder value between 0 and i and will suit the book of the clip relative to the volume of the Audio Source.
This is groovy for variation because it means that you can laissez passer in a randomised volume value, or play two different clips at different volumes, without changing the overall book of the Sound Source itself.
Play One Shot is platonic for audio effects, peculiarly repeating sounds (for example gunfire). Triggering Play I Shot on an Sound Source that'south already playing will overlap the sounds (instead of interrupting it, similar it would with Play).
This makes Play One Shot especially suitable for repeating sounds just be careful. Try not to allow too many sounds to overlap all at once.
Despite simply playing from ane Audio Source, 2 sounds triggered via Play One Shot will count as ii 'voices'. And fifty-fifty though the maximum voice limit can be increased from the default 32 voices, different platforms accept different limitations, and then it's good practice to try to keep the total phonation count as low as possible to avoid sounds being culled.
- Find out more nigh Play One Shot
How to utilize Play Clip At Point
//Plays a clip in one case at a specific position, without an Audio Source AudioSource.PlayClipAtPoint(AudioClip prune, Vector3 playPosition, Bladder volume); Play Clip at Betoken works in a like style to Play One Shot with one big deviation. It doesn't require an Audio Source to work.
This is great for one-off sounds as you won't demand to add an Audio Source component to an object, yous can just burn down a sound one time, from a specified position in the Scene, without any fuss.
public form PlayAudio : MonoBehaviour { public AudioClip clip; public float book=one; void Start() { AudioSource.PlayClipAtPoint(prune, transform.position, volume); } } Note the capital A in 'AudioSource', every bit Play Clip at Bespeak uses the Audio Source course, instead of an instance of an Sound Source.
Yous too have to pass in a position that the Sound Clip volition play from. In this instance I've used the position of the object that this script is attached to.
And then how does this work exactly?
When using Play Clip At Point, Unity creates a temporary Audio Source to play the clip from.
Behind the scenes, Unity creates a new, temporary Sound Source to play the clip from and disposes of it once the clip is finished. In the editor, yous'll see a new Game Object appear and disappear when this happens. This makes Play Clip at Indicate especially useful when using an Audio Source Component isn't an option.
For example, when playing a sound when an object is destroyed.
If the Audio Source is on the object that's existence destroyed the sound will unremarkably exist cut off, or it may never become a take a chance to start, as the Sound Source now longer exists.
Using Play Clip at Point instead allows the audio to go along after the object is destroyed via a temporary Sound Source that is neatly tending of one time the sound is finished.
Still, at that place is a catch…
The downside of using Play Clip at Point
Because the Audio Source that the clip is played from is created at run time, you lot don't get the selection to change whatsoever of the Audio Source'due south settings. The Audio Source is created using default settings, with the exception of spatial blend which volition be set to fully 3D.
This also ways that you can't use Play Clip at Point with an Audio Mixer. The output volition go directly to the Audio Listener, every bit it does past default.
If you do demand to alter whatever of the Audio Source'southward settings in that location are means you can get effectually this (past creating your own modified version of the Play Clip at Bespeak functionality). Still, in that scenario, it's probably going to be much, much easier to simply use a regular Sound Source.
How to use Play Delayed and Play Scheduled
Play Delayed and Play Scheduled let you to play an Audio Source in the futurity, in ii dissimilar means.
Play Delayed
//Plays an Audio Source after a delay AudioSource.PlayDelayed(float delay); The beginning, Play Delayed, takes a delay in seconds and is the simplest method for delaying an Audio Clip.
public class PlayAudio : MonoBehaviour { public AudioSource audioSource; public float delay=4; void Start() { // Plays an Audio Clip after 4 seconds audioSource.PlayDelayed(delay); } } This method is like shooting fish in a barrel to utilise and is ideal for quickly changing the timing of an Audio Source.
Examples of when you would utilise this include delaying the kickoff of music, sound effects that occur after the effect that triggers them, like lightning and thunder for example, and other timing tweaks and randomisations.
Play Delayed is neat for simple timing, but it is non suitable for more precise timekeeping, similar stitching two clips together or beat matching sound clips.
For that, yous demand PlayScheduled.
Play Scheduled
//Plays an Audio Source at a precise time AudioSource.PlayScheduled(double timeToPlay); Play Scheduled works a little differently to Play Delayed, but it'south incredibly precise.
This is due to the fact that it operates using the actual audio engine fourth dimension and takes a highly authentic double value, instead of a float.
To use information technology, you need to specify the time the Audio Source should start, not a filibuster. This corresponds to the AudioSettings.dspTime, which is the number of seconds the audio engine has been running.
Play Scheduled is ideal for precise audio timing tasks, like queueing sound clips to play exactly after one another, or for beat matching.
The beneath instance hows how to queue a clip to play seamlessly subsequently another clip has finished.
public class PlayAudio : MonoBehaviour { public AudioSource audioSource1; public AudioSource audioSource2; void Start() { audioSource1.PlayScheduled(AudioSettings.dspTime); double clipLength = audioSource1.clip.samples / audioSource1.clip.frequency; audioSource2.PlayScheduled(AudioSettings.dspTime + clipLength); } In that location's a lot that you tin can exercise with PlayScheduled. So much that I wrote a huge guide on just that, with examples of how to queue up clips, trounce lucifer audio and how to stop loops with musical stings.
- How to queue audio clips in Unity: The ultimate guide to Play Scheduled
Using isPlaying when scheduling audio won't work
When scheduling audio using either method, the Audio Source is considered to exist playing as soon as it is scheduled and until later on it has finished. This happens as before long as the Audio Source is queued, not when the sound starts, so isPlaying volition exist true, even if no audio is beingness fabricated still.
This ways that, when scheduling audio, yous cannot cheque if the audio has started or stopped using isPlaying.
How to employ Play on Awake
Play on awake is the easiest way to trigger a sound, as it requires no scripting whatsoever.
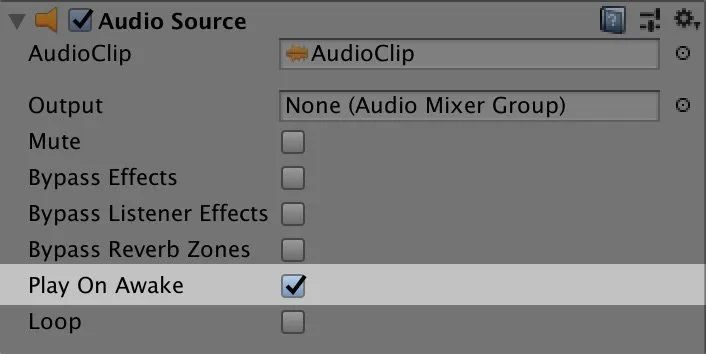
Play on Awake is enabled past default.
Enabled by default, Play on Awake volition start the Audio Source as soon as the object is enabled. This will usually be the start of the scene if the Game Object is already enabled or, if information technology is disabled, Play on Awake will fire as shortly equally the Game Object, or the Audio Source, becomes active.
This is useful for automatically starting audio when an object loads, such as music at the start of a scene or a sound that plays when an object is initialised.
For case, to add together a sound when a new object is created, merely add an Audio Source component to the prefab of that object and make sure Play on Awake is checked. Then, when the object is added to the Scene, the sound will play.
For more information on the different methods that can be chosen from an Audio Source, try Unity'due south official documentation.
Set-made options
While Unity's built-in options for handling audio are much meliorate than they used to be, if y'all want piece of cake access to advanced audio features (or even if you just desire to save some time) you lot might want to consider an audio manager plugin from the Unity Asset Shop.
Master Audio, for case, has long been the aureate standard in audio manager assets. Fully featured and well supported, it offers avant-garde features, such as audio occlusion, as well as basic conveniences, such as solutions for adding sounds to odd-shaped objects (such as rivers for example). The Multiplayer version extends the asset further, making, normally challenging, multiplayer sound, much easier.
For larger developers, Fmod and Wwise are powerful audio integration options, both of which are compatible with Unity (Fmod has a Unity plugin which you can download from the Asset Store here). While powerful, their advanced features are offered under licensing tiers which are, much like Unity, based on revenue and production budget. For more, bank check the official websites hither: Fmod, Wwise.
Audio trigger examples
Now you know the different methods for triggering audio in Unity information technology's time to put them to work.
Beneath yous'll find some examples of common audio triggers that you can copy and paste in to your projection.
How to play a random sound
What'due south the all-time style to select a random sound in Unity?
Showtime, create an Audio Source and an array of Audio Clips.
public AudioSource audioSource; public AudioClip[] audioClipArray; Back in Unity, add together the different Audio Clips to the Array.
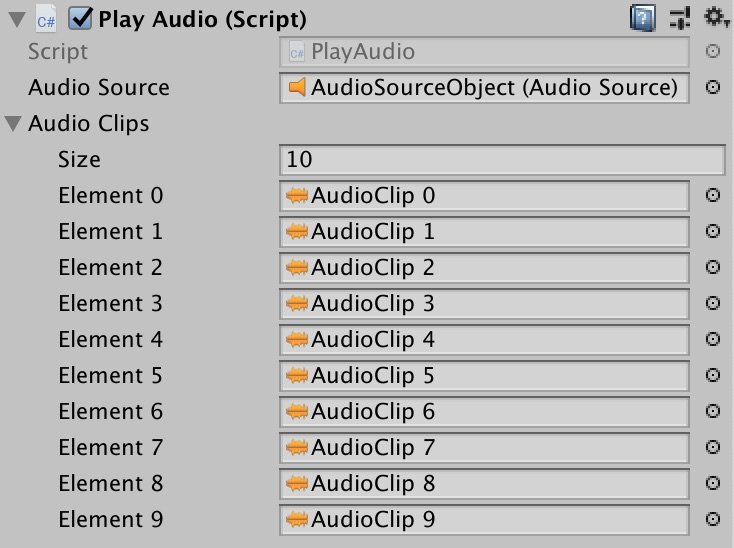
An Assortment of Audio Clips
Next, write a function, with an Audio Clip render blazon, to select one of the clips at random.
AudioClip RandomClip(){ render audioClipArray[Random.Range(0, audioClipArray.Length)]; } And so whenever you desire to utilize a random Audio Clip, pass in the function where you would normally pass in the clip proper noun:
void Start() { audioSource.PlayOneShot(RandomClip()); } How to trigger a random sound, with no repeats
To forbid the same sound triggering twice in a row, shop the previous sound in a variable and bank check against it with a while statement, like this:
public class PlayAudio : MonoBehaviour { public AudioSource audioSource; public AudioClip[] audioClipArray; AudioClip lastClip; void Start() { audioSource.PlayOneShot(RandomClip()); } AudioClip RandomClip() { int attempts = iii; AudioClip newClip = audioClipArray[Random.Range(0, audioClipArray.Length)]; while (newClip == lastClip && attempts > 0) { newClip = audioClipArray[Random.Range(0, audioClipArray.Length)]; attempts--; } lastClip = newClip; return newClip; } } How to play a repeating sound
Here'due south an example of how to trigger a sound repeatedly in Unity, in this case for a machine gun that fires every 0.25 seconds.
I'm also using the Audio Clip assortment from the last example to apply a random audio every fourth dimension the gun is fired.
public course PlayAudio : MonoBehaviour { public AudioSource audioSource; public AudioClip[] audioClipArray; public float timeBetweenShots = 0.25f; bladder timer; void Update() { timer += Time.deltaTime; if (timer > timeBetweenShots) { audioSource.PlayOneShot(RandomClip()); timer = 0; } } AudioClip RandomClip() { return audioClipArray[Random.Range(0, audioClipArray.Length-1)]; } } How to play a sound when pressing a button
Unity has a built in method for triggering events when a button is pressed and this includes an option for playing an Audio Clip.
Just create an On Click upshot trigger, elevate a Game Object to the object field and select PlayOneShot(AudioClip) from the Audio Source section of the driblet downward carte du jour.
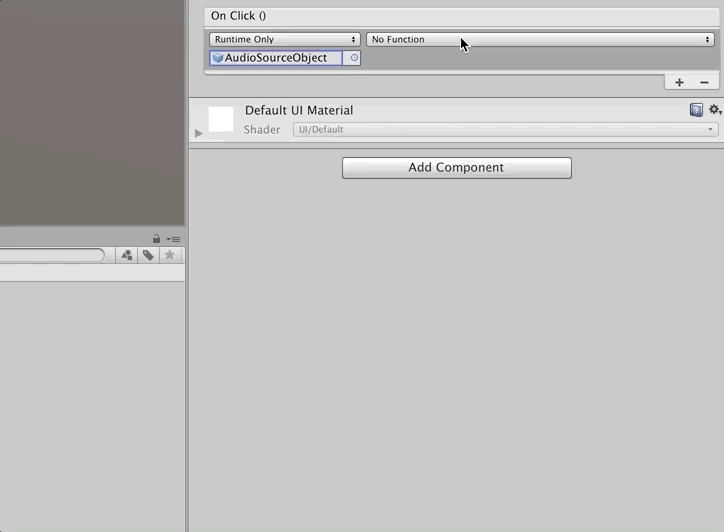
Drag an object with an Audio Source to the button On Click issue, then select one of the Play options. Piece of cake!
In one case you've selected Play One Shot, select an Sound Clip to play in the new field that appears.
Past using Play I Shot, information technology's possible to have different buttons play different sounds using merely a unmarried Audio Source.
However, yous can also select from Play, or PlayDelayed, only like when playing from a script.
How to start music when entering an area (3D & second)
How tin you create a music trigger in Unity that fires when the player enters a specific area?
Start create the Trigger:
- Create a shape, such as a cube that will human action as the trigger area in the scene.
- Remove the mesh renderer if there is one, you won't demand information technology for this.
- On the Collider component make certain Is Trigger is set to truthful.
- If the Player object doesn't have 1 already, you'll demand to add a Rigidbody component for this to work.
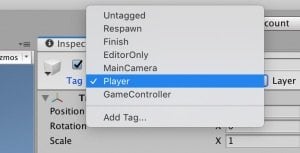
- Finally, on the Player object, select the Histrion Tag.
Side by side, add this script to the trigger area:
public class PlayOnCollision : MonoBehaviour { public AudioSource audioSource; void OnTriggerEnter(Collider other) { if (other.tag == "Player" && !audioSource.isPlaying) { audioSource.Play(); } } } How to create a trigger sound in 2d
To create the aforementioned effect in a second project, simply use the 2D Collider and 2d Rigidbody, making sure to update the script to lucifer:
void OnTriggerEnter2D(Collider2D other) { if (other.tag == "Player" && !audioSource.isPlaying) { audioSource.Play(); } } How to play a audio when colliding with an object (3D & 2D)
Simply like entering an area, yous tin trigger a sound when two objects collide, for example if an object falls on the basis.
Also like entering an area, the object volition need to have a Rigidbody component for this to piece of work.
Place this script on the moving object:
public course PlayOnCollision : MonoBehaviour { public AudioSource audioSource; void OnCollisionEnter(Standoff collision) { audioSource.Play(); } } To prevent small-scale collisions triggering the audio, it's possible to only play the sound for larger collisions, by checking the velocity of the collision:
public grade PlayOnCollision : MonoBehaviour { public AudioSource audioSource; void OnCollisionEnter(Collision collision) { if(collision.relativeVelocity.magnitude > 1) audioSource.Play(); } } Or, for a more than natural sounding collision, you can vary the book based on the force of the collision.
public class PlayOnCollision : MonoBehaviour { public AudioSource audioSource; public float maxForce = v; void OnCollisionEnter(Collision collision) { bladder force = collision.relativeVelocity.magnitude; float volume = i; if (forcefulness <= maxForce) { volume = force / maxForce; } audioSource.PlayOneShot(audioSource.clip, volume); } } The max volume value decides what force of impact volition produce the loudest sound. A value that exceeds the max force will simply play at full volume.
How to create a collision sound in 2D
The same method can exist used to create a collision sound result in a 2d game using 2d Colliders, a 2d Rigidbody and updating the script classes to match, similar this:
void OnCollisionEnter2D(Collision2D collision) { audioSource.Play(); } How to play a sound when destroying an object
To play a sound that continues afterward an object has been destroyed, ane option is to use Play Prune at Bespeak, similar this:
public grade PlayOnDestroy : MonoBehaviour { public AudioClip audioClip; void DestroyObject() { AudioSource.PlayClipAtPoint(audioClip, transform.position); Destroy(gameObject); } } This works by creating a temporary Audio Source that plays at the object's last position, fifty-fifty though the original object is gone.
Now I'd similar to hear from you…
Hopefully, these tips and examples will help you play audio in Unity more hands.
At the very to the lowest degree you now know many of the basic options available for playing audio in Unity, making it easier to build more than complex audio systems.
Merely now I want to hear from you…
How volition you use these examples in your game? Or maybe your project needs something dissimilar, that's not in this article. What challenges did y'all face when starting with the nuts of audio in Unity?
Let me know by leaving a comment below.

My favourite time-saving Unity avails
Rewired (the best input direction system)
Rewired is an input management nugget that extends Unity's default input system, the Input Manager, adding much needed improvements and support for modern devices. Put simply, it'south much more avant-garde than the default Input Managing director and more than reliable than Unity'south new Input Arrangement. When I tested both systems, I found Rewired to be surprisingly easy to employ and fully featured, so I tin can understand why everyone loves it.
DOTween Pro (should exist built into Unity)
An asset and so useful, it should already exist built into Unity. Except information technology's not. DOTween Pro is an animation and timing tool that allows you to animate annihilation in Unity. You can move, fade, scale, rotate without writing Coroutines or Lerp functions.
Easy Save (there'due south no reason not to utilise it)
Like shooting fish in a barrel Salve makes managing game saves and file serialization extremely like shooting fish in a barrel in Unity. So much and then that, for the time it would take to build a salve system, vs the cost of buying Like shooting fish in a barrel Save, I don't recommend making your own save system since Piece of cake Save already exists.
Source: https://gamedevbeginner.com/how-to-play-audio-in-unity-with-examples/
0 Response to "When Enabling a Script in Unity Will It Run the Start Function Again"
Postar um comentário